
Project Overview
SkillsToDrive was an application that allowed an examiner to facilitate the driving portion of a driver’s license exam digitally via a tablet. Originally, the examiners would use paper forms and the opportunity for mistakes and cheating were very high. While creating this experience, we had to take into consideration several factors that would allow the examiner to easily score and also notate any events that occurred during the testing, but also allow for data to be captured automatically in the background.
Project Details
Date: 01.2020 – 12.2020
Role: Lead UX Designer
Skills Utilized
- Agile Development Process
- Product Research
- Rapid Prototyping (Sketch + InVision)
- Interactive Prototyping (Axure)
- Lead Scrum Ceremonies
- Design System Utilization
- ADA Compliance Validation
- Managed Contracted Development Team
Phase 01 – Discovery
Problem Statement
We had two sets of problems to overcome: updating a legacy application and bringing in new jurisdictions who were using pencil and paper scoring.
The legacy application was plagued with multiple issues. Users would have to zoom in to areas with small text in order to be able to read it and the UI was so small that only a stylus would accurately register any sort of marking. With all of these issues, the users of this product were making mistakes or taking too long to document the performance of the person taking the driving test.
The jurisdictions using pencil and paper didn’t want to lose the freedom of being able to note and annotate, but they also were concerned about making sure their data was being captured on the spot instead of having to manually input the tests after the test had concluded. The lack of GPS tracking or route confirmation was also a major concern for these jurisdictions.
User Research
Not all projects are perfect and sometimes you need to adapt to the current team’s workflow. In opposition to my typical process, I was not able to conduct any preemptive user research directly with the users for this project. The Product Owner and the System Architect traveled to one of the jurisdiction’s offices in order to assess their needs and requirements and were shown how a driven test was facilitated. Luckily for me, the System Architect and I have worked together closely since I had started with the company, so he took very robust notes keeping UX principals in mind and we put our heads together and dug into the requirements as a team. (Call out to Justin Coulston, who is a fantastic System Architect)

Feature Requirements
While the legacy application could address some of these requirements, it did not address them sufficiently. We took the information from previous feedback of the legacy application along with the feedback we received from the pencil and paper tests and put together a main list of requirements for the long term scope of the project.
- Accessible UI to allow for easy reading and finger based scoring
- Break up scoring by maneuvers (different aspects of the test itself)
- Robust note taking ability
- Split up between maneuver, invalidation, and exam completion
- Helpful tool tips to inform the instructor of scoring definitions
- Auto-fail mechanisms
- Overall exam process tracking
- Speed monitoring
- Enhanced security measures
- GPS Tracking – Track where the driver is going as well as the speed for testing purposes
- Emergency Event Trigger – Is the instructor doesn’t feel safe at any time, they would be able to alert the office
- Upload test results when connected to Wi-fi
- Capture vehicle information via camera
- Allow for route management via a web portal
Phase 02 – Design
We brought on a project management and development team to help us with the building of the application. I worked closely with the team to develop and build the application and would meet with the team daily. We went through several possible build options to make sure when we sold the application that it would be easily implemented on a wide variety of tablets.
The team then broke the workflows into 3 different groupings in order to tackle the features of each of the groups individually.
01 – Pre-Test Workflow
- View Appointments
- Select a Route
- Walk-In Appointments
- Vehicle Information
- Attestation
02 – Maneuvers Workflow
- Maneuver Scoring
- Quick Grading
- Note Taking
- Informational Modal
03 -Post Test Workflow
- Automatic Failure Prompts
- Examination Review Screens
- Driver Signature Capture
- Test Uploading


")
01 – Pre-Test
We wanted to make the Pre-Test section as clean and streamlined as possible in order to allow the Examiners to handle anything that would come their way. Their workflow included online and phone scheduling but they made it clear that there would always be a possibility of walk-ins. The ability to edit applicant information was also important as applicants and DMV employees alike were known to accidentally input information incorrectly. The photo validation was to help curb any sort of cheating that has been known to occur with these sort of tests.
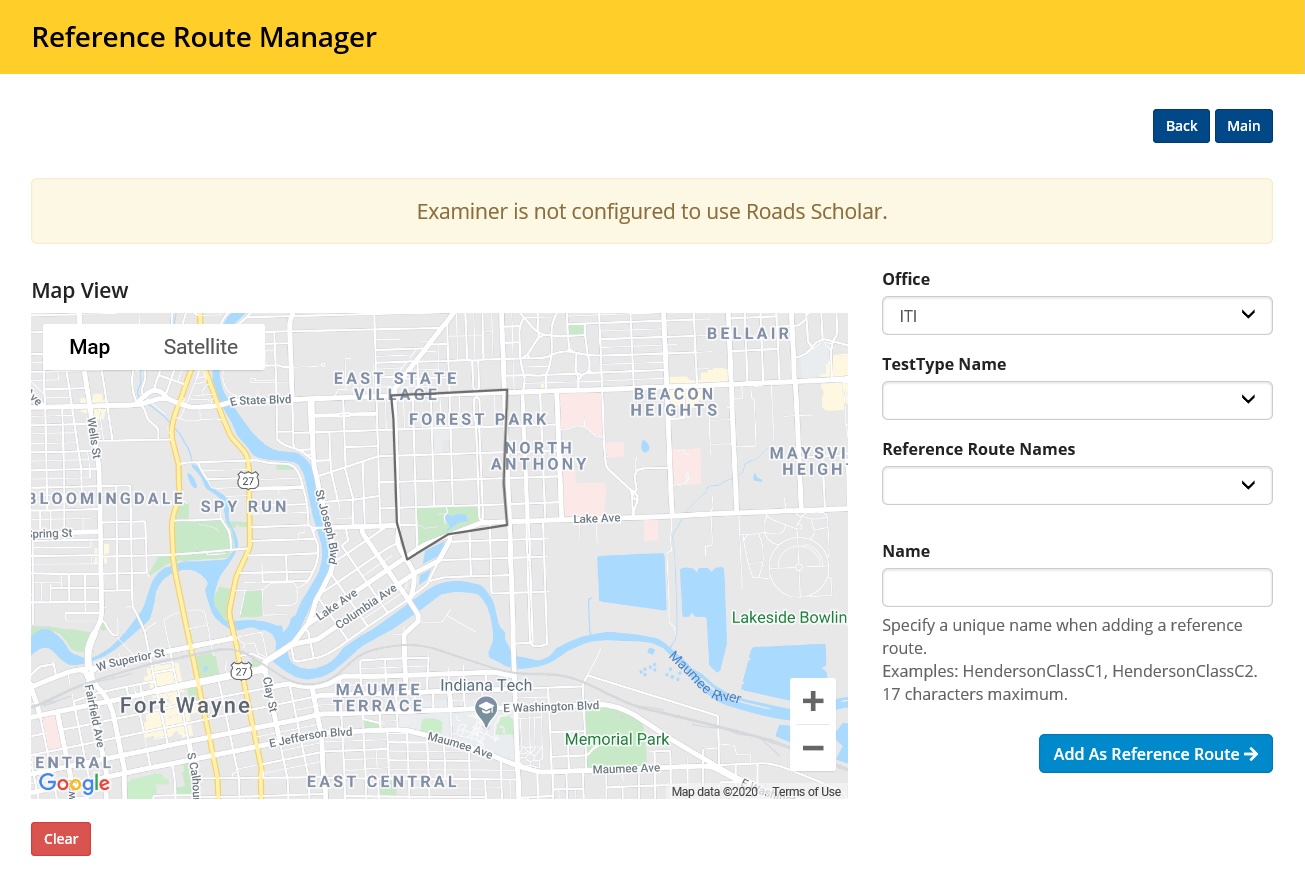
The route selection was a very important aspect to the process. Originally, some of these routes were unofficial and examiners had their own places they would take applicants. The issue with this was that it would make it difficult to gather any sort of analytics going this direction. If the examiners would stick to predetermined routes, the application would be able to track GPS data and track the speed more accurately in order to capture these valuable data points. Unofficial routes would also increase the chance of some applicants having a more difficult experience than others. The clients were encouraged to embrace set routes in order to unify the experience for everyone.
A feature that didn’t make it into the MVP was that the administrative application would use APIs to track the road conditions in the route management system in order to alert examiners if there was construction or weather related hazards.
Pre-Test Workflow
- Examiners would log into the application and see the appointments for the day.
- If there was a Walk-In applicant, we allowed for a manual input of their data.
- If the Examiner needed to view any previous appointments, they would also be able to do so.
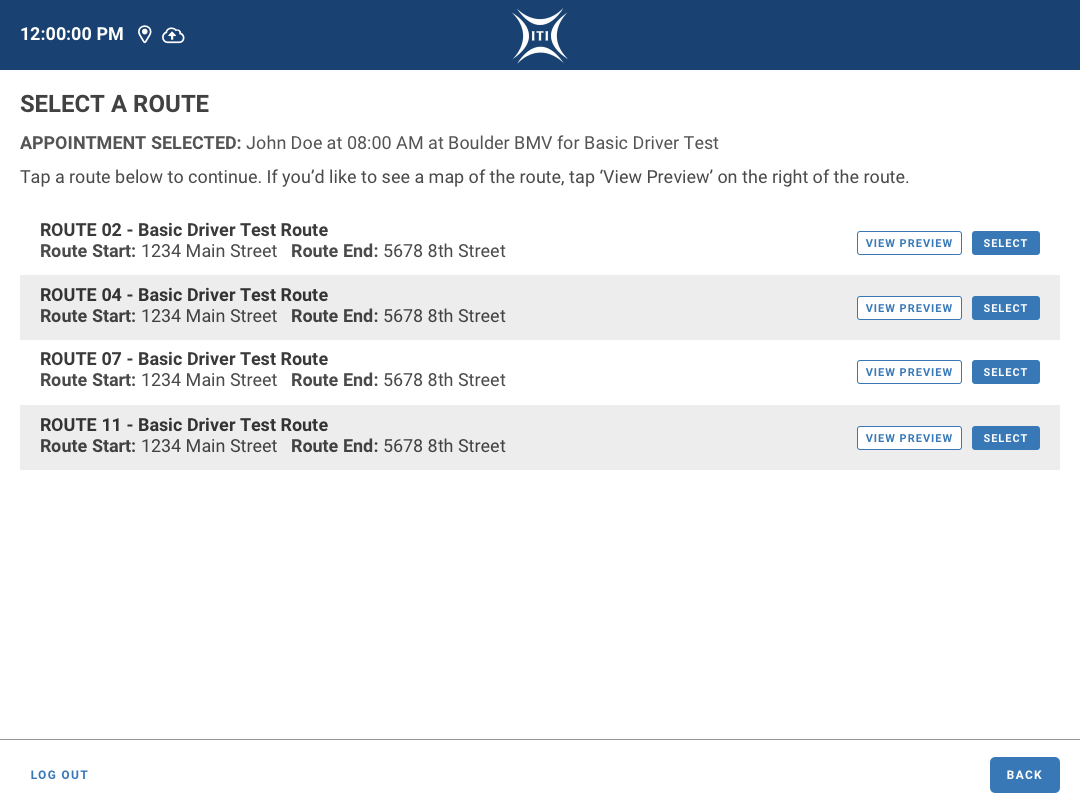
- Examiners would then select a route for the test to be conducted on.
- These routes would be managed on an external site, which was also being developed in tandem.
- The examiner would be able to see a map of the route in order to verify which route they were selecting.
- Examiners were then prompted to verify the applicants information.
- The application would then prompt the examiner to take a photograph of the applicant using the tablet’s camera.
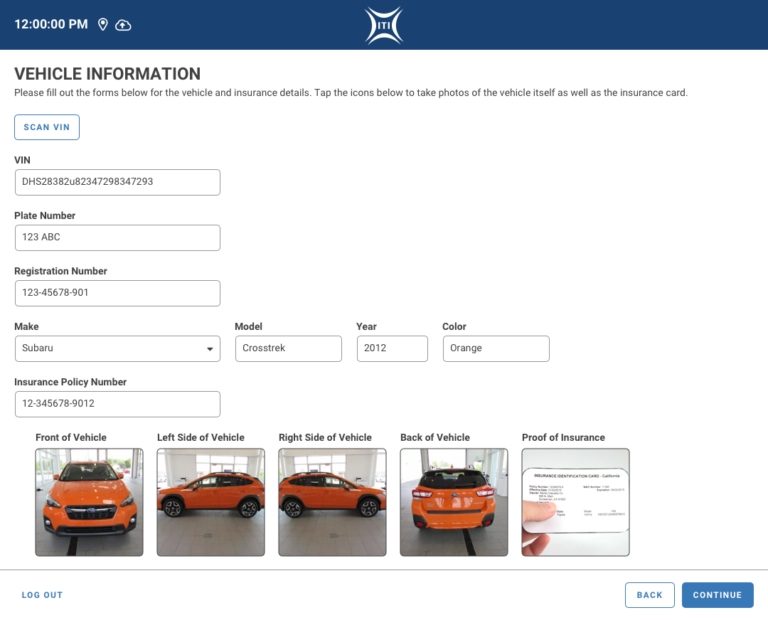
- Examiners were then prompted to enter the vehicle information.
- There would be an option to scan the VIN to auto populate the information.
- The application would then prompt the examiner to take photographs of the vehicle from different angles as well as a proof of insurance card.
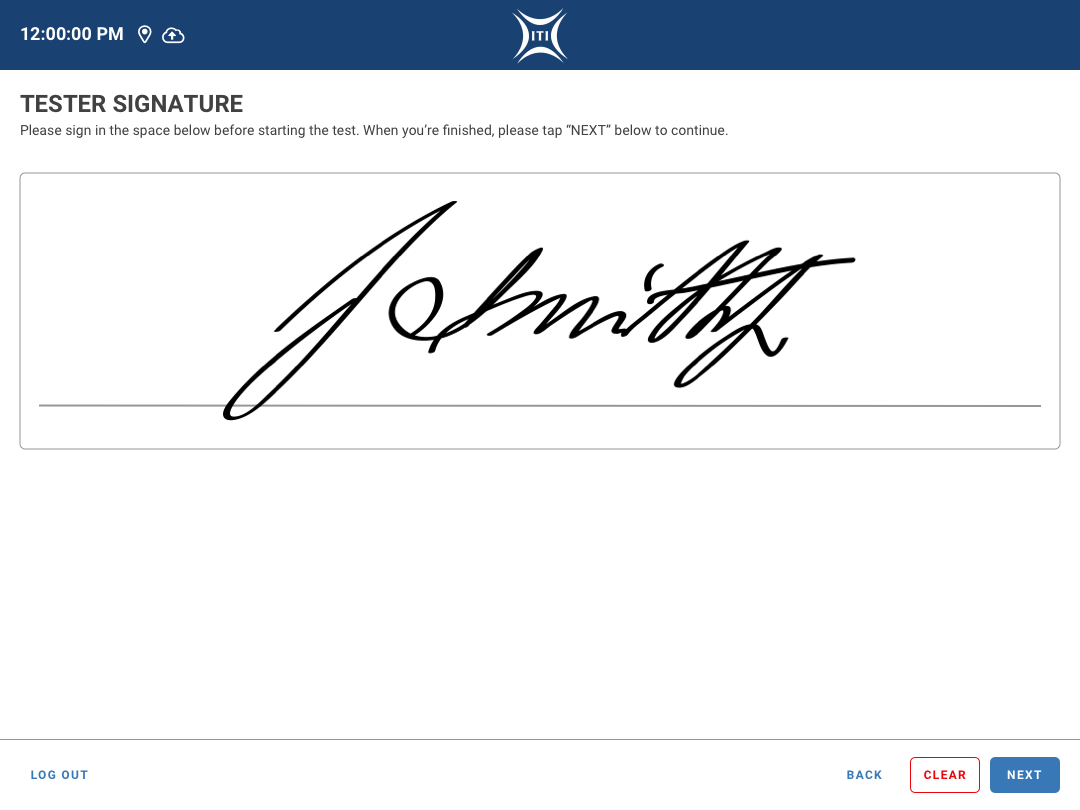
- Lastly, the examiner would read the Attestation to the applicant and have them agree to the terms and conditions.
- The examiner would then be prompted to gather the applicant’s signature on the tablet.
02 – Maneuvers

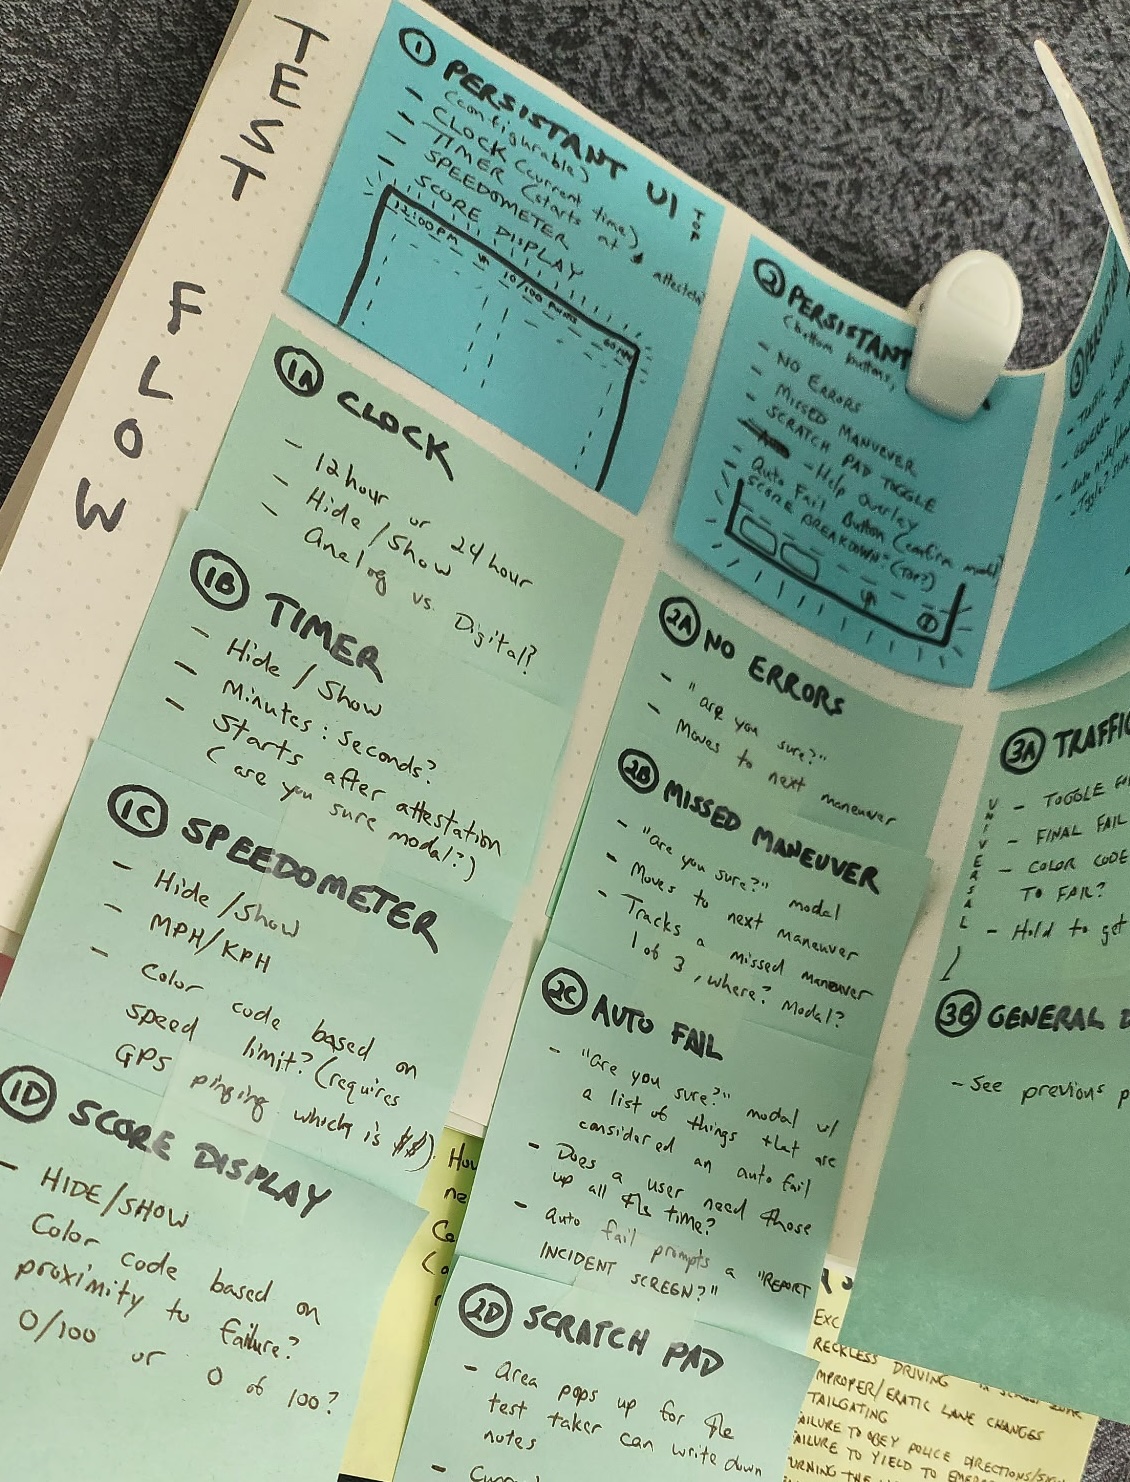
The scoring was where we would need to be the most flexible for the examiners. We avoided the mistakes of the legacy application by breaking up the different driving encounters (maneuvers) into their own screens in order to give the examiners plenty of room to score and take notes. Considering the need to be have flexible hardware options, we didn’t want to force the users to use a stylus, so we made sure the UI was accessible and able to be activated via touch.
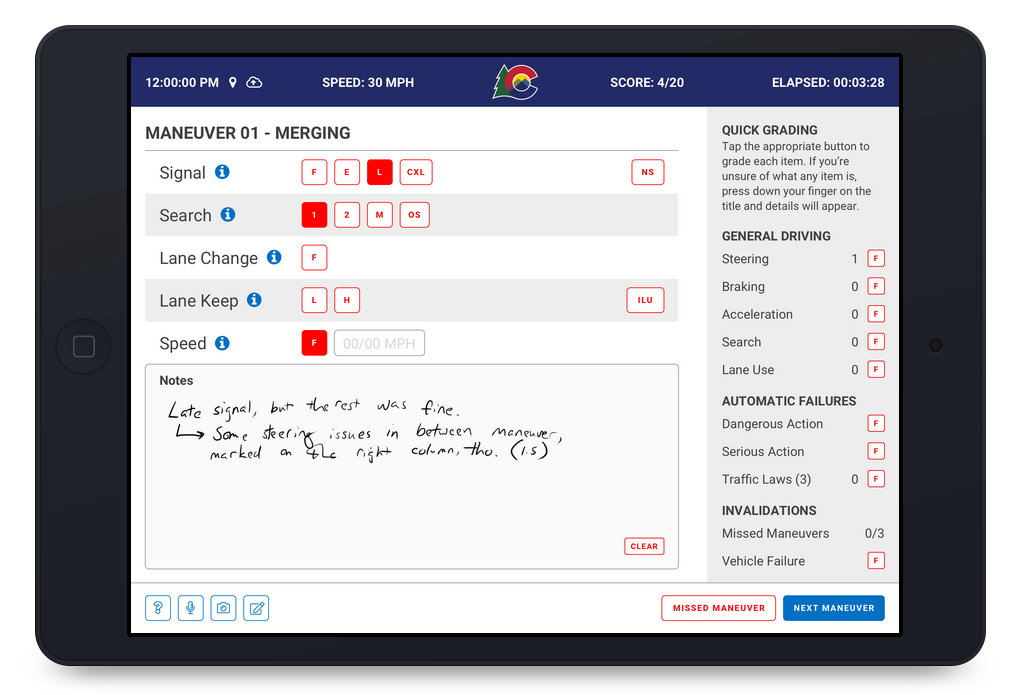
Maneuver Scoring
The applicant is lead through the route that was selected in the Pre-Test workflow by the examiner using different situations that the applicant will encounter called Maneuvers. There are several different ways to score each of the maneuvers and each maneuver has its own scoring parameters. Some of these scoring indicators are conditional, so once you score a Search for example, you are given additional options to score after that toggle is active.
The scoring itself uses some rather cryptic language, so we added a informational (?) button for the examiner to be able to remind themselves what the scoring might entail. This prompts a dismissable overlay that spells out each of the scoring parameters for them to reference. As much as most examiners are pretty experienced, we all know that sometimes its good to have a quick reference. Better safe than sorry!
Quick Grading
Some of the grading was not maneuver specific and needed to be able to be accessed at any point in time during the examination. The quick grading panel is present throughout the examination and can be interacted with at any time. The scoring for each of these items is a much simpler F or “fail” condition. The applicant can only accrue a certain number of these or else they would fail the test, so we added a counter for the examiner to be able to track the progress. If the applicant would accrue too many fails from the Quick Grading sidebar, they would immediately be prompted to a failure screen and the test would be ended.
Some of the General Driving options required further clarification and specific reasoning, so a modal pops allowing the examiner to specify which law or action the applicant engaged in. As shown in the example to the left, breaking some of the traffic laws would immediately cause the applicant to fail the examination. These values would changed based on the jurisdiction, so we made sure these variables were configurable.


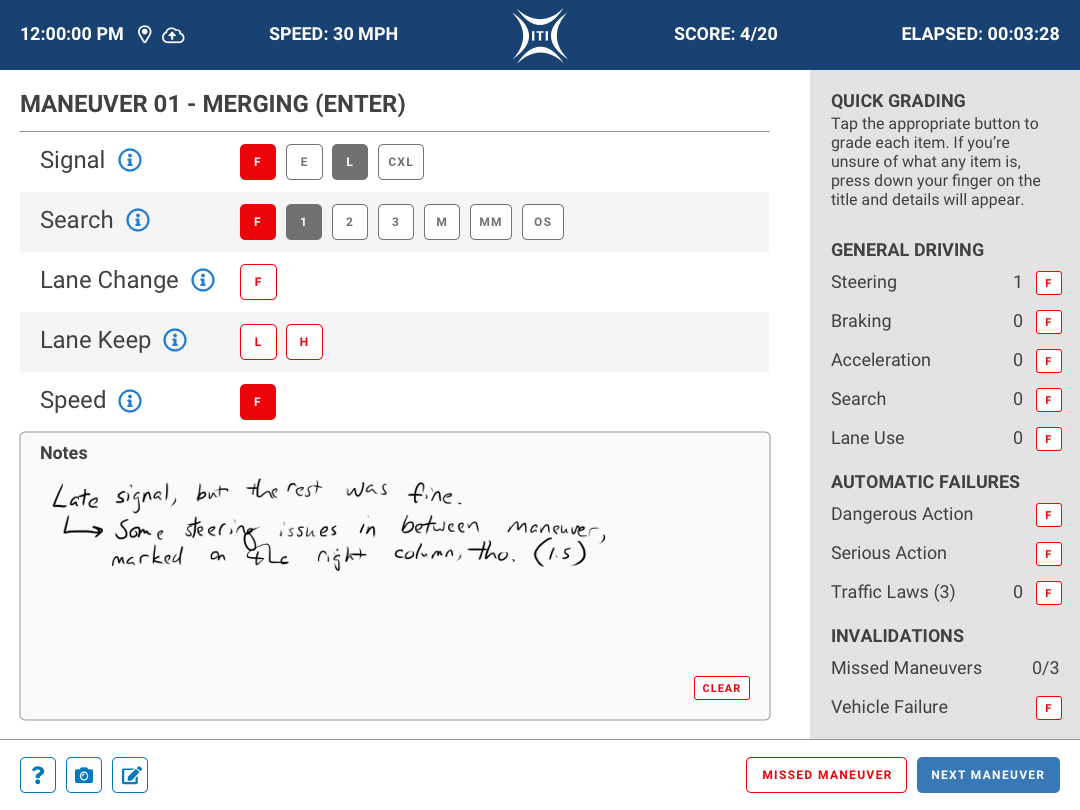
Notes
The amount of notes, drawings, and all sorts of information that was written on the physical score sheets was pretty impressive considering how little time examiners had to record the information. We needed to make sure the examiner had the ability to retain that freedom. We used the space under the scoring elements as a Notes section and added a Clear button in order to make it easy for them to quickly erase any mistakes. These notes would be captured on a maneuver by maneuver basis on the back end so when the tests needed to be reviewed, they would have context. There was much more we wanted to add to these sections (erasers, brush sizes, etc.), but those would be saved for future iterations of the application.
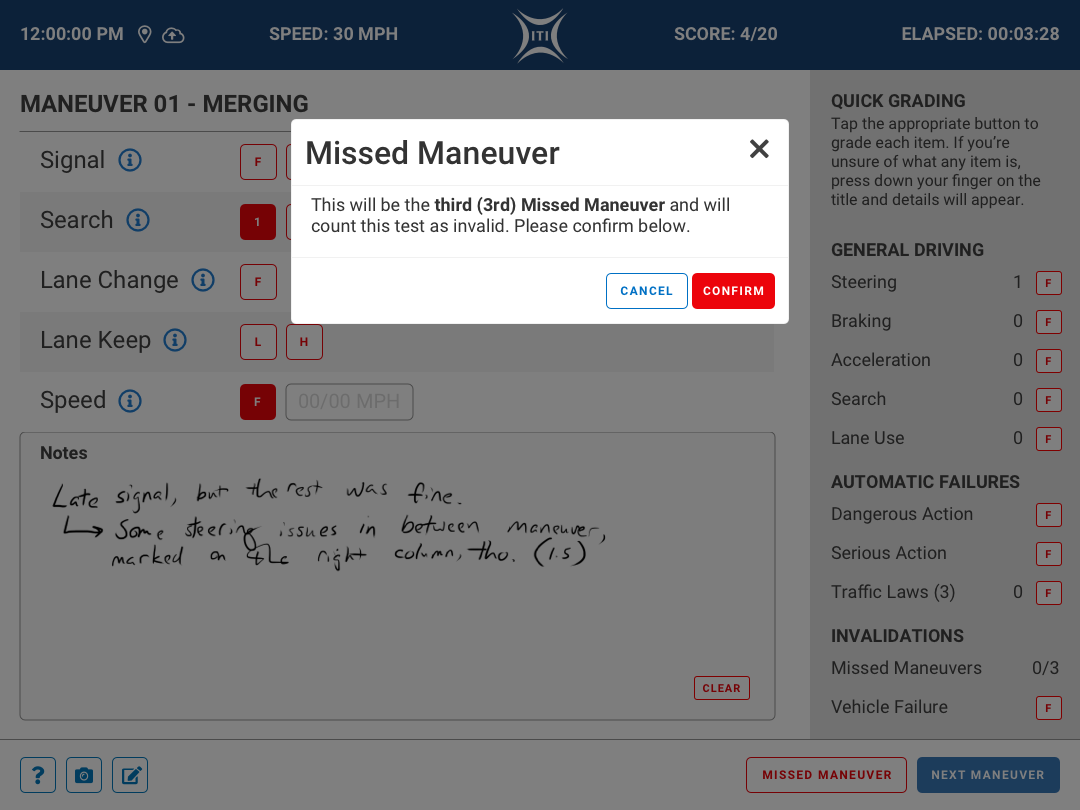
Navigation Controls
Navigating through the maneuvers was an important part of the process. There was the possibility that the applicant would have no issues and breezed through the maneuver, so there was a No Errors button that took the examiner to the next maneuver immediately.
On the other hand, some applicants may completely miss a maneuver and would need to not only move on to the next maneuver, but also track that the previous maneuver had been missed. These applicants could be new drivers, so some leeway is given, but there are only so many instances where this can occur. A Missed Maneuver button was added next to the No Errors button which prompts a modal asking for confirmation to avoid errors. Once that is confirmed, there is a counter for Missed Maneuvers on the Quick Grading side panel that would increase. If the applicant misses a particular number of maneuvers, the test is ended as an Invalidation, allowing the applicant to take the test again at a later date.
03 – Post Test
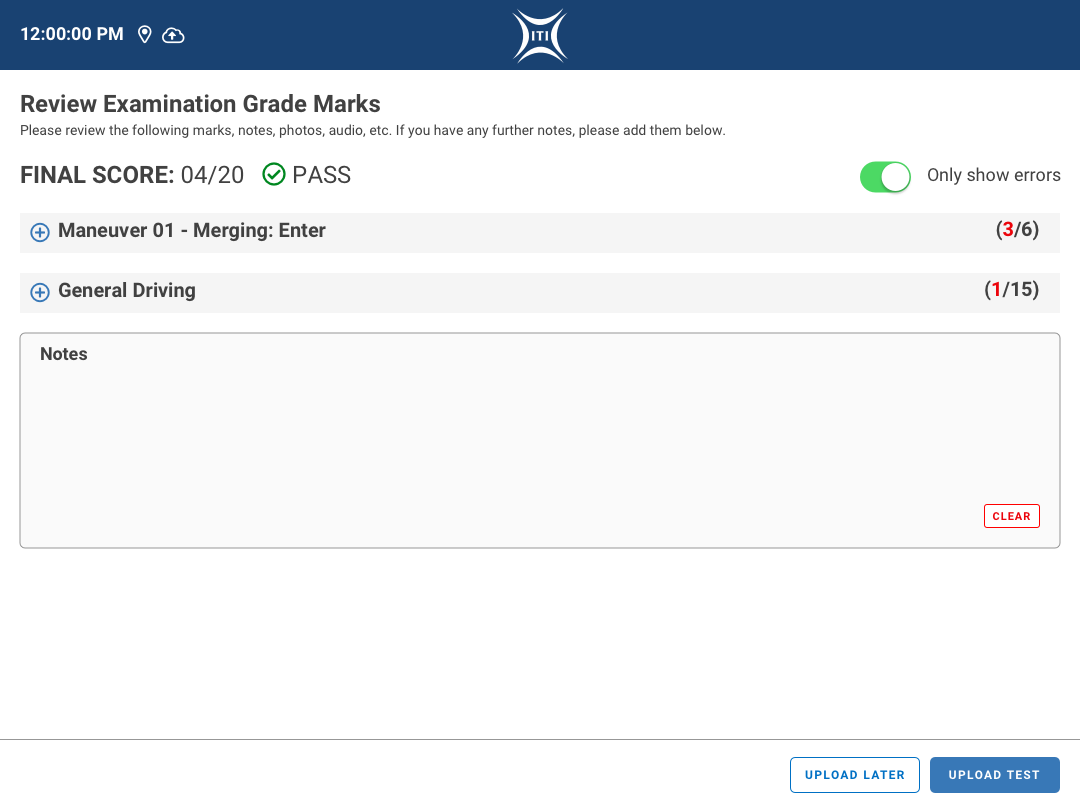
Examination Review
Finally, we reach the Examination Review once the applicant has finished their test. The examiner shows the applicant the results on this screen and goes over all of the marks made again them. After this review is complete, the applicant is prompted to sign and accept the results of the test.
This screen is broken up into a few sections:
- Final Score
- The results of the examination shown via numbers of failures versus the total number of possible grades.
- A visual notification of whether or not they passed.
- A toggle to only show the maneuver sub sections that had failures in order to keep this screen more compact for easy digestion of information.
- Maneuver by Maneuver Sub Sections
- Each sub section can be expanded and hidden to show the details of each maneuver.
- The header of the sub section lists the maneuver name and how many failures occurred during that maneuver.
- Each sub section has a list of the scoring that occurred during the maneuver as well as a visual representation of how the applicant did.
- The scoring is shown in plain text and not using the examiner shorthand in order for the applicant to understand their results.
- There is also a link to show the notes that were taken by the examiner.
- This is not shown by default just in case the examiners do not wish for their notes to be shown to the applicant.
- Overall Exam Notes
- This section can be used by the examiner to leave any additional notes to be added to the applicant’s file.
Additional Outcomes
As discussed in the Maneuver section above, there are instances where the test goes outside of the happy path and has to be stopped prematurely. These actions can either be an Invalidation or an Automatic Failure.
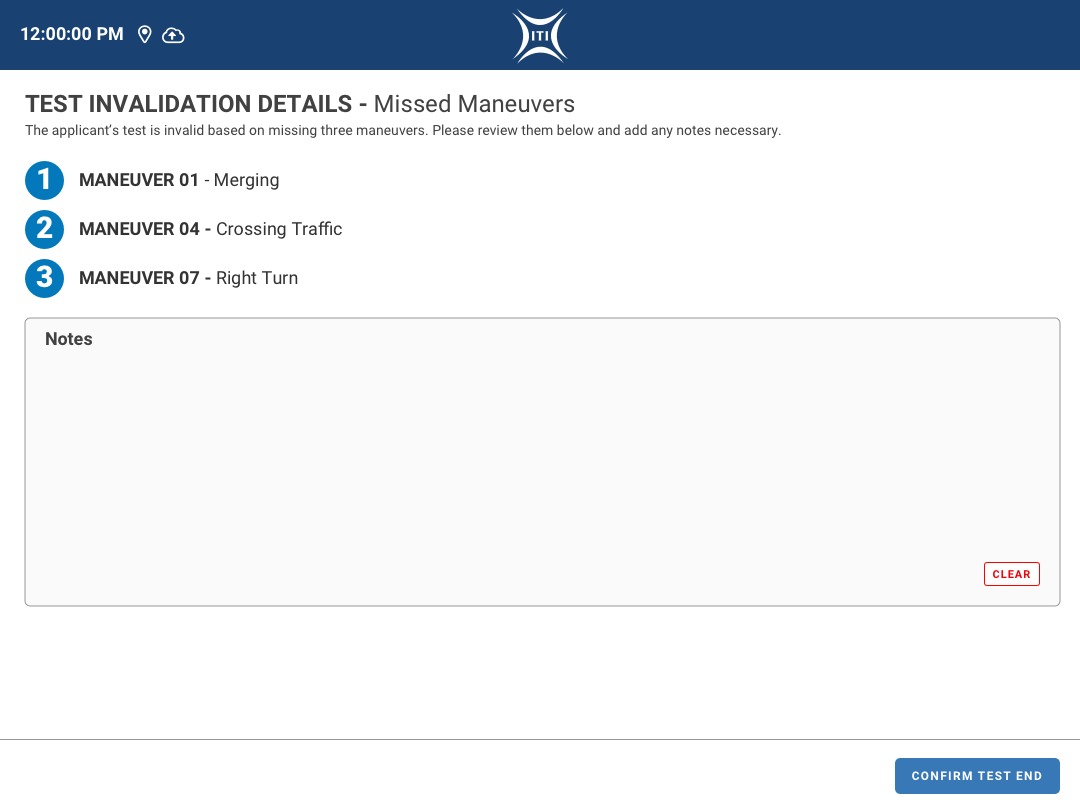
Invalidations
When an applicant either misses a certain number of maneuvers or has a vehicle failure, the examination is Invalidated. The examiner is then immediately brought to a screen that gives the details about the occurrence and allows them to take notes in the space provided. In the case of a vehicle failure, the examiner is also given the option to take photographs of the vehicle. Invalidations do not count as failures for the applicant, which is also tracked in the back end of the system.
Automatic Failures
Some actions during the test will trigger Automatic Failures. These are triggered in the Quick Grading sidebar and will either call up a modal for clarification or immediately end the test. These can be broken into 3 different groupings:
Traffic Laws
Once this option is checked, a modal will appear prompting the examiner to select which of the laws were broken. If over a certain amount of these are selected, the test will immediately end and forward the examiner to a failure screen allowing them to record any additional notes they might have.
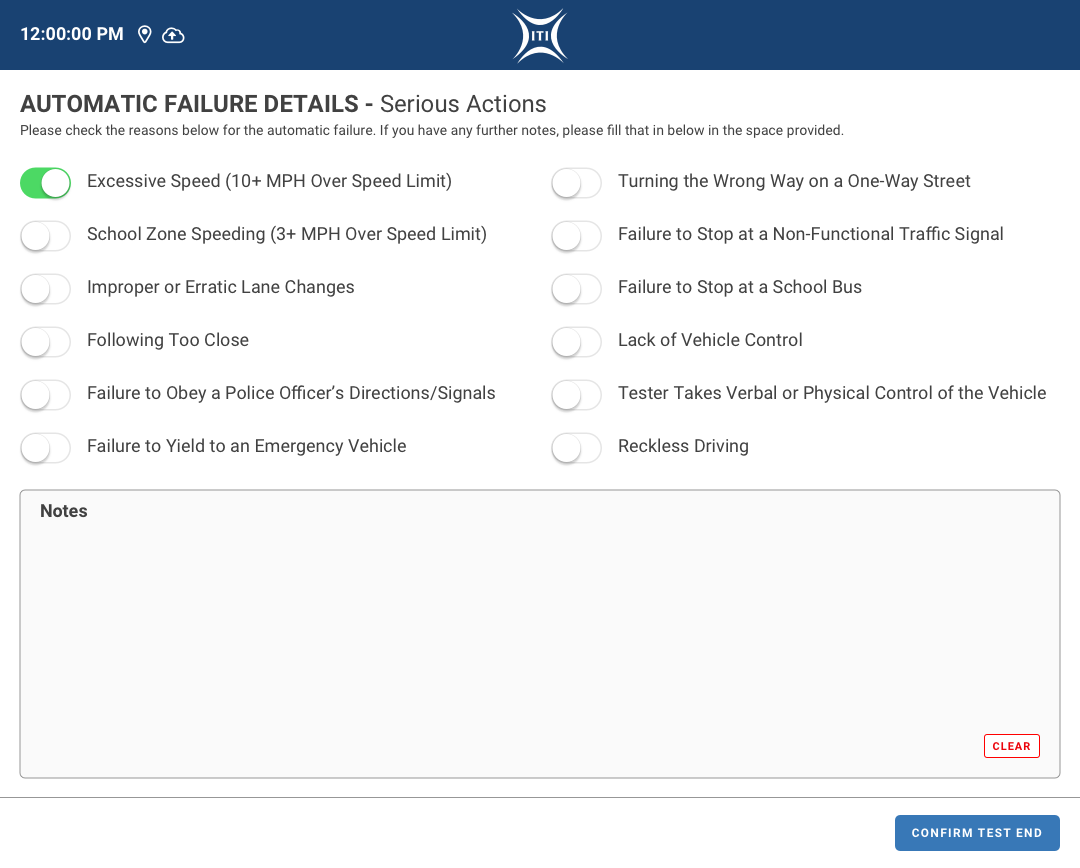
Serious Actions
Some traffic violations are more serious than others. Examples being excessive speeding (10+ mph over the speed limit) or driving the wrong way on a one-way street. When the examiner taps the Serious Actions option, the examination is immediately ended and they are taken to a failure screen specifically for Serious Actions to record which of the displayed actions occurred. As with other details screens, the examiner is also given the ability to record any further notes.
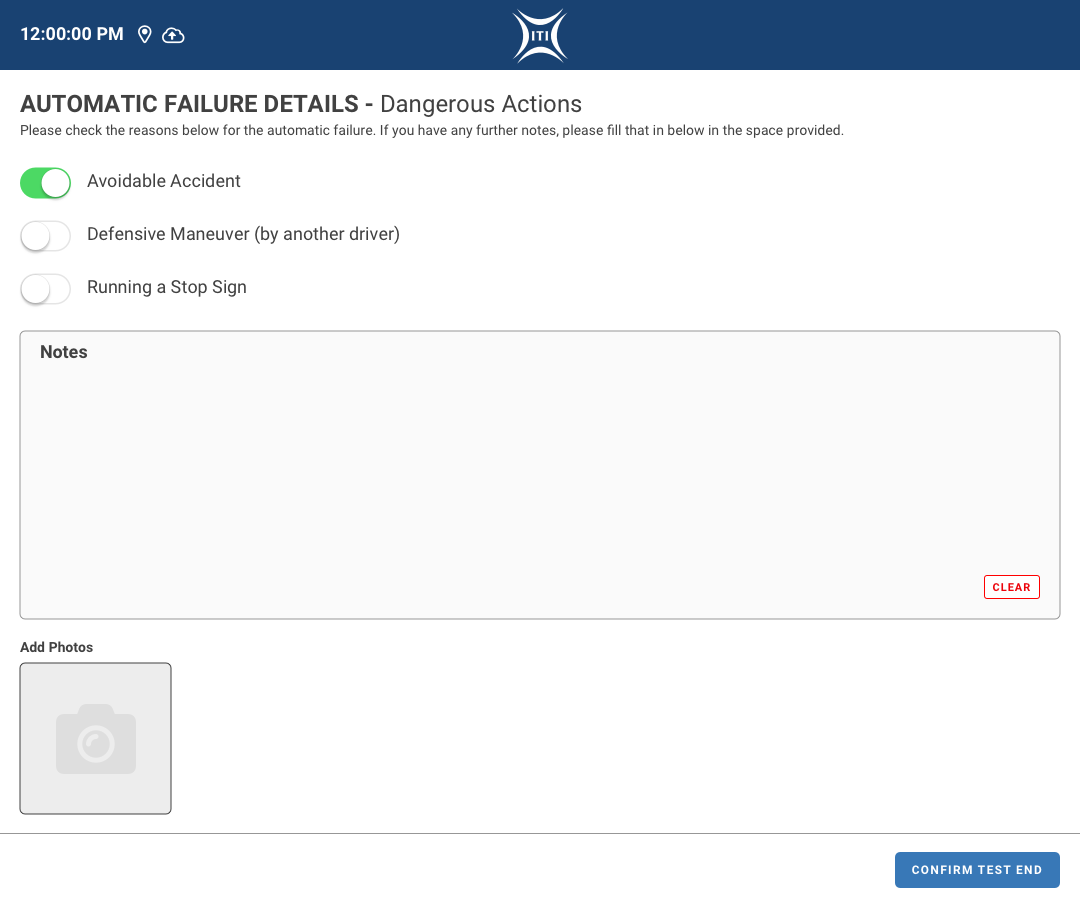
Dangerous Actions
And finally, the last category of actions that cause an automatic failure are Dangerous Actions. These are the following:
- Avoidable accident
- Defensive maneuver by another driver to avoid the applicant
- Running a stop sign
Similarly to the serious actions, when the Dangerous Actions option is tapped, the examination ends and the examiner is brought to a details page for them to select which of the actions occurred. In addition to notes, the examiner is also given the option to add photos if it is necessary (such as in a case of an accident for insurance purposes).
Phase 03 – Build & Iterate

Application Build
After the designs were reviewed and discussed with the internal product team as well as the development team, we moved into the build phase. I worked closely with the app developers to ensure the Design System parameters were followed and addressed any other issues that popped up during the process. I really enjoy working with development teams on these projects directly as while building we are able to collaboratively address issues and work together to find solutions that don’t compromise the vision of the project. Rapid fire problem solving at its best!
As a former web designer and front-end developer, I really like to dig into the nitty gritty when applications are built. I work closely with the front-end developers to make sure all of the design specifications are met and will pair program with them as often as I can to avoid numerous back and forth reviews. I also made sure to create a design system cheat sheet for them with hex codes and margin/spacing guidelines to avoid any extra back and forth over such issues.
Iteration and Going Forward
While we were not able to do user testing with actual examiners from the local BMV, we did internal testing with some of our customer service staff who also assisted in QA for other applications that are built in house. Some of those QA testers were already familiar with the legacy application, so they were experienced with the process and concepts. This helped out a lot!
The feedback we received was great and we gathered some great suggestions for future enhancements to the tool that ranged from more expansive note taking options to thoughts on consolidating some of the processes. Due to the fact that we were developing this application in house to sell to state governments, we couldn’t really dig deep or adjust any of the processes without actually engaging with those teams, so we stored the feedback away and added it to our documentation for future discussions.
Final Thoughts
I learned a lot from this project due to the limitations that we faced. As much as I wanted to be able to do extensive user testing or in-depth dives into how these exams are conducted, timelines aren’t always long enough and governments aren’t always open to letting private contractors interview their teams as often as you’d like. You need to work with what you have and get creative with the methods that you use to get the outcomes that will make a project successful.